Shelby Cobra Replica – Grille Screen Installation Guide
Included Parts:
- 4 Glass Reinforced Plastic (GRP) mounting blocks (2 marked T for Top, 2 marked B for Bottom)
- Fastening screws and floating nuts
- Grille screen
Step-by-Step Instructions
1. Position the Mounting Blocks
- Identify the Top (T) and Bottom (B) mounting blocks.
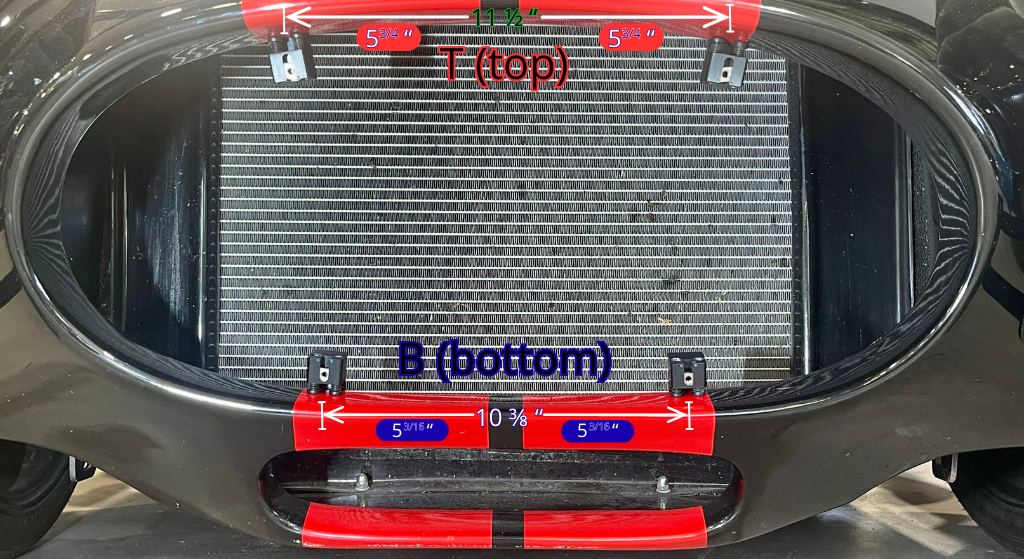
- Using the radiator opening as your reference, position the blocks:
- Bottom mounts: approximately 10 3/8″ center-to-center (see bottom brackets in the photo).
- Top mounts: approximately 11 1/2″ center-to-center (see top brackets in the photo).
💡 Tip: Use painter’s tape or a marker to lightly mark your centers before fastening.
2. Secure the Blocks
- Attach the mounting blocks using the provided screws.
- Tighten firmly, but avoid overtightening — GRP is very strong but can be stressed by excess torque.
3. Test-Fit the Grille Screen
- Place the grille screen against the face of the blocks.
- Select the hole on each block that lines up with the floating nut inside.
- You may need to slide a block slightly left or right for perfect alignment.
4. Adjust the Floating Nuts
- Use a paperclip or thin pick to move the floating nut up or down until the holes align.
- Once aligned, insert the fastening screws by hand to ensure smooth threading.
5. Final Fastening
- With all four screws aligned, tighten them down evenly.
- Apply medium-strength Loctite to each screw to prevent loosening from vibration.
- Verify that the grille is centered, flush, and firmly seated.
✅ Result: The GRP mounting blocks give you a corrosion-proof, long-lasting base that holds the screen securely while protecting your radiator and maintaining the authentic Cobra look.

